Friday, October 11, 2019

MIDI Self-playing Guitar (Part 3)

Last time I told you about my failures in trying to fret guitar strings using a range of techniques. Now I will describe how I actually got it to work.

I used the same method for controlling the vacuum that I described earlier. That is, solenoid valves were controlled by the Arduino Due. When an individual valve was opened it would apply a partial vacuum to a particular pneumatic.

In the picture to the right you can see the plastic pipe that connects the vacuum pump to the solenoid valves, and thence to the pneumatics. Connected to each of the pneumatics is a wire. When the vacuum is applied to a particular pneumatic it pulls on the wire.


Here is the attachment of the wire to the pneumatic. As you may be able to discern this is done through a turnbuckle that I 3D printed. The reason that I went to this trouble is that the length of the wire is critical as you can see in the next picture.


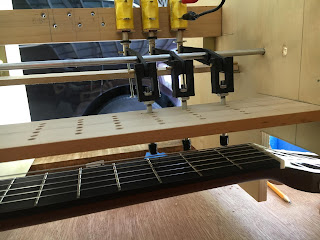
These are the "fingers" that actually press on the strings. The wires from the pneumatics attach to the top of the fingers. Pulling on the wire causes the lower end of the finger to push the string against the fret. As I said, the length of the wire is critical. That is because when the pneumatic is not activated the bottom of the finger must be well clear of string so as not to buzz or damp the string if it is plucked. On the other hand, it must be close enough to the string so that when the pneumatic is activated it presses firmly on the string.

And here is what it looks like overall. The silver wires from the twenty-three pneumatics lead to the compressed space where the corresponding fingers hover about the fret board. Thus, twenty-three fretted strings plus six open strings gives twenty-nine notes or about two and one-half octaves.

And once again here is the link to a quick video that might help to understand how it all goes together in case my explanation is lacking.

Tuesday, September 24, 2019

MIDI Self-playing Guitar (Part 2)


This is a continuation of the description of the design of my MIDI guitar. In the first part I explained how I handled the picking of the strings. Here I will explain the process I went through to handle fretting.

I had used solenoids on the organ and thought that would be a good idea for the guitar as well. Space is tight on the neck of a guitar but my plan was to use levers to transfer the motion from the solenoids into the tight confines of the fret board. Here are  pictures of a prototype.


Another advantage of the levers was that I could trade-off stroke length and force by moving the pivot point of the lever. Unfortunately my solenoids didn't have enough inherent stroke and power to both firmly press the string against the fret as well as withdraw far enough such that they did not interfere with the vibrating string. I tried many different pivot positions but none proved to be dependable enough to satisfy me.


While mulling this problem I happened to think of player pianos. They need a long powerful stroke, especially on the lower keys. And they trigger those key presses via a tiny amount of air drawn through holes in a paper roll.  I didn't know how they worked so once again I matriculated at the University of YouTube.


I found that they used pneumatics designed like little bellows. Here are pictures of the bottom and top of one I made to experiment with. In the first picture the large hole on the right goes through to the inside of the pneumatic. When that hole is connected to a vacuum pump it sucks the top of the device down. However, I needed something to open it back up when the vacuum was removed. I thought about various types of springs, both internal and external. Ultimately, though, I decided to use rare earth magnets. That's what the large blind holes on bottom and top are for. I glued magnets into each of those, with common poles facing each other so they repelled. That seemed to do the trick.

One of the advantage of these pneumatics is that their throw and force can be adjusted by simply changing their size. I made mine about  four inches long and one inch wide, which I think is a typical size for pianos. The purple stuff is a synthetic bellows cloth made specifically for player pianos.
It is pretty air-tight, cuts and glues easily, and is thin and flexible enough to fold well. The small hole on the top is to bleed air back into the pneumatic allowing it to expand when the vacuum is no longer connected. The small holes on the bottom are just screw holes drilled for various prototype configurations.


But how do you connect and disconnect the vacuum you might ask. I thought I would use these solenoid operated valves that I got from Adafruit.com for another project that has not yet come to fruition (no pun intended). In player pianos they often use these beautiful little valves that are themselves operated by pneumatics, triggered by the air flowing through the little hole in the paper of the piano roll, but I would have had to used little solenoids, which I didn't have, and which would have cost almost as much as the valves, which I did have. This decision led to a completed device that more or less dwarfs the guitar itself, but more on that later.

Next I had to figure out how the pneumatics would actually push the strings down onto the frets.

I thought a good idea would be to drill holes in the fret board and mount the pneumatics under the neck of the guitar. I then connected a wire and ran it up through the hole and put a little 90-degree bend in the end. To that bend I added a little 3d printed plastic button. Those buttons were kind of noisy so I added a wrap of leather around the button. Good idea, huh? Well, not so much. This scheme had the advantage that as it played it was easy to observe the fretting of the strings. The major disadvantage was that things were so packed together that it was very difficult to fit the wires, and there wasn't room to squeeze in adjusters for the wire lengths. The length of the wire is critical because the button must rise high enough when that pneumatic is not activated so the string doesn't buzz against it, yet pull down far enough to press the string firmly against the fret when the pneumatic is triggered. I spent approximately 142 man-years trying to get them all adjusted, finally considering using a sledge hammer as an adjustment tool, and  ultimately falling back to re-group.

OK, that's it for this episode. In the next one I'll describe my perhaps ungainly but more or less successful solution. Thanks for your interest.


Sunday, September 1, 2019

MIDI Self-playing Guitar (Part 1)

I enjoyed making the MIDI Pipe Organ that I described in earlier posts on this blog titled Music & Me Parts 1 through 5. I brought the Organ to a couple of Orlando (Fla.) Maker Faires. It was well received. In fact, the second year that I went a couple of people told me that they came back looking for the Organ specifically, having seen it the previous year. The problem is that the Organ has forty-two separate pipes, plus the wind chest/base, plus the blower. It's heavy to move around, and time consuming to set up and take down, and complicated to transport. I thought I'd try to make something a little more portable, and a guitar came to mind. That was my first mistake.

Here we are, two years later, and only now are things starting to come together. I can, however, tell you a bunch of ways not to make a self-playing guitar. Before I get into my story, though, I have posted a rough video on YouTube for those of you who want to hear the guitar but aren't interested in how I got there, and you can see it here. (I will also work on my spelling.)

There are, of course, two parts (hands) involved in playing the guitar, the picking typically done with the right hand, and the fretting typically done with the left. While I worked on these concurrently I think the story will be easier to follow if I talk about the picking first, and then the fretting.


This was one of my early attempts. I used hobby servos, attached arms to them, and attached guitar picks to the arms. The problem I had here was that sometimes the pick would bend, but not snap over the string. I would then lengthen the stroke. Unfortunately, if the arm swung far enough to pluck the string often the pick would wind up in contact with the adjacent string.

OK, no problem. I would just make the picks stiffer so they wouldn't bend so much. Here is a picture of the next version. That seemed to work pretty well, until I started fretting the strings. Because there was no flex in the picks their positioning was critical. If they caught too much string they would just drag the string along with them. If the strings were open (unfretted) they worked fine. However, when they were fretted the string would be pushed closer to the guitar and the pick would barely catch the string or miss it completely. I was not able to find a setting that worked consistently.


So next I went back to the flexible picks. But this time I changed the mechanics. Here is a drawing that might help me explain. The blue boxes are the servos, the red lines are the picks. The black dots are meant to represent the six strings of the guitar, but try to picture that you are looking right down the string, such that it is coming out of the page. If you can picture that you can see that when the pick is swung to the left as in Position 1 it doesn't interfere the the next string. As the pick starts to swing it will hit its string as in position 2. Finally, in position 3 it can't interfere with the string on the other side.

This scheme still requires careful adjustment of the height of the picks but they can be set such that they consistently pick an open or fretted string without coming in contact with adjoining strings.

Alright, so that's the design that settled on for picking the strings. Ultimately the speed of the guitar will be limited by (among other things) the speed of the servos and the lengths of the strokes. I don't think I'll be able to compete with Slash or Jimmy Page but as the Brits say, "The best is the enemy of the good."

In my next post I'll fret about fretting.