Wednesday, September 8, 2021

Indoor Carbon Dioxide Monitor

 One might ask why someone would want to monitor the levels of carbon dioxide (CO2) in his or her indoor environment. Well, let me tell you about an article that I read in Make Magazine makezine.com.

The article was written by Dale Dougherty and Guido Burger. The essence is that the concentration of CO2 can have a significant effect on the transmissibility of disease. Further, it can have an impact on people's mental acuity. 

Let's look at these in turn. The authors cited an article titled effect of ventilation improvement during a tuberculosis outbreak in underventilated university buildings  ncbi.nlm.nih.gov/pmc/articles/PMC7217216/  While I encourage you to read the article or at least the abstract, the conclusion was that some poorly ventilated rooms at the university were registering CO2 levels above 3,000 parts per million (ppm). When the levels were reduced to under 600 ppm the transmission of tuberculosis from the environment ceased. Of course this doesn't have anything directly to do with CO2 but rather measuring the concentration of CO2 is an easy way to determine how effectively the air is being turned over in an indoor environment. The concentration of CO2 in outdoor air is about 430 ppm.

The second article referenced was Impact of CO2 on decision-making Usha Satish, Mark j. Mendell, et al. 2012. doi.org/10.1289/ehp.1104789  This article found negative impacts on mental acuity that were caused apparently by the higher concentrations of CO2 found in some office environments.

Well, that's enough of that. I encourage you to read the papers but I found this interesting given the current discussions concerning school reopenings with high levels of Covid infections. One of my daughters is a teacher and I thought it would be interesting to build a CO2 monitor that she could place in her classroom. The article in Make Magazine that I mentioned above describes a wonderful assortment of form factors and displays for this type of device. I wanted to build something quickly for my daughter to use and made the device shown on the right. It shows the current CO2 concentration and every 15 seconds adds a bar to the graph. 


Simple is the key word here. There is a microcontroller, a TFT display, a CO2 sensor, and connector to hook them together. Adafruit developed a standard for microcontroller shapes and pinouts such that anything that meets the "feather" standard can be plugged together. I happened to have a Sparkfun esp32 Thing Plus, which adheres to the feather standard. This is a more powerful processor than that required for this project but, as I said I had it just sitting around. From Adafruit I ordered a "TFT FeatherWing 2.4in." display, an "SCD-40 True CO2" sensor and a "STEMMA QT / Qwiic" connector cable.

Once the parts arrived it literally took less than a minute to connect them together. The processor plugs into the back of the screen.


And they look like this when they're put together.


Then it was just a matter of plugging one end of the cable into the processor and the other end into the sensor.


I wrote the software in an afternoon with the help of the example program in the library that supports the sensor and the detailed Adafruit document that supports the display. Then I printed a case on my 3D printer and it was done. In the picture of the case you can see the little cage on the lower edge of the case back on the right in the picture. This is where the sensor sits so it is exposed to the air.


I sent it off to my daughter and will post an update after she has had a chance to try it out.




Wednesday, March 10, 2021

Embroidery Floss Winder


My daughter has a business via which she sells counted-cross-stitch kits, Sew Irreverent. The kits include a pattern and  as many as a dozen different colors of floss. When she puts together these kits she needs to measure the amount of floss in each color to include, as well as wind the floss on a bobbin. As you can imagine this can be very time consuming.

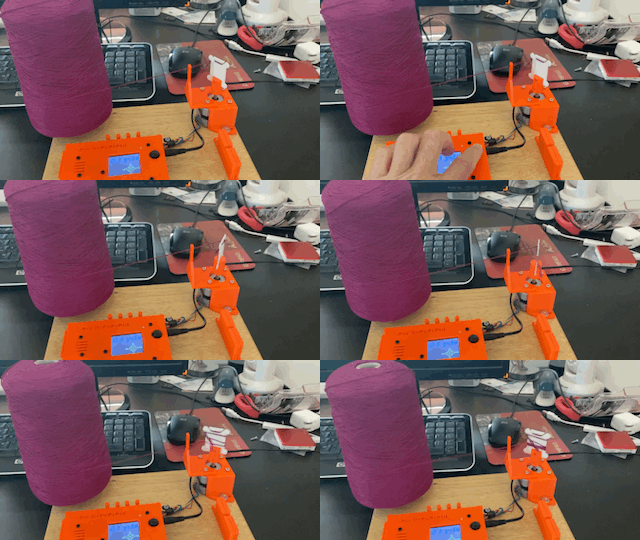
She and I got our heads together and came up with the device shown here to facilitate the process. The heart of it is a small computer that allows her to specify how much floss she wants, and then starts and stops a small motor that winds the desired amount of floss onto a bobbin. Here it is in some more detail.


To the right is a picture of the winder itself. The muscle is a small stepper motor designed to be controlled by a computer. Attached to the shaft of the motor is a cylinder with a slit in it and a peg. These hold the bobbin in place during the winding process. We found that some paper bobbins were a little too flexible to work well by themselves so we made a backer that can be seen in the lower left of the picture. This attaches to the cylinder via the peg and thus provides enough stiffness for the paper bobbins during winding but allows easy separation from the wound bobbin.

In the upper center of the picture is just a simple guide through which the thread is passed before being attached to the bobbin for winding.


Here is the box that contains the tiny computer that controls the winder motor. In the upper right are the wires coming from the motor that connect to the computer.


This picture shows how the device is controlled. The large black button on the right is actually a little joystick. The diamond shape on the screen is the key for the user as to how to specify the length of floss to wind. The default is 3 yards. Pushing the joystick forward increases that number by 1. Pulling the joystick back decreases by 1. Right increases by 10 and left decreases by 10. Pushing downward on the joystick starts the winding process.


We also added a couple of convenience features. The first is a tool for cutting the floss. It is a shroud that holds a standard single edge razor blade. This picture shows the blade being inserted into the shroud.


And in this picture the blade is completely inserted, providing a V-shaped slot exposing a small amount of the blade for easy floss cutting but precluding any hand cutting.

The second convenience feature can be seen in the upper left of this picture. It is a tape measure inlaid into the platform to facilitate any quick measurements.


Finally, here is the whole device as I was packing it up to send it to my daughter. In the back right of the device in the picture you can see the cone shaped pieces that take a standard size spool of embroidery floss.

Well, that's it. If you have any questions please post them in the comments.