Monday, December 30, 2013

3D Printer

Best of the season to everyone. For Christmas, Peg gave me a 3D printer. For those of you who have spent the last couple of years in a sensory deprivation chamber, 3D printers are devices that can print solid objects a little like a dot matrix printer (for those of you who remember them) can print text on paper. These devices have been around for twenty-five or thirty years, but in the last couple they have gotten much cheaper. This is due to several things. These include the "maker movement" where is has become popular to create and build things oneself, the "open hardware movement", where people place the designs they develop in the public domain, and the expiration of some key patents.

These devices can print in a range of materials from various plastics to metals to sugar and chocolate. They range in price and capability from tens or even hundreds of thousands of dollars for large, highly developed machines that can print metal parts that are ready to be used, to a few hundred dollars for hobbyist machines that will print in one kind of plastic and that require more hand-holding to produce satisfactory results.  Below is a picture of a MakerBot Replicator 2. This might be described as a pro-sumer machine. It is a well developed device that is designed to print in one kind of plastic. Right now it costs around $2,200.


 That was too much for me to spend so I went a different way. There is an organization called the RepRap Project that developed plans for a series of 3D printers and published those plans for free. Thus, if you have a 3D Printer you can use it to produce another 3D printer. In this case that only goes for the plastic pieces, not the metal bits or the electronics, but you get the idea.

Below is a chart showing the usage by printer type.

Source: Moilanen, J. & Vadén, T.: Manufacturing in motion: first survey on the 3D printing community, Statistical Studies of Peer Production.
RepRap is really just plans, not a device, but there is an outfit called RepRapPro that sells kits for the RepRap printers and that's where Peg got mine. It is called a RepRapPro Mono Mendel and below is a picture of the assembled device.


I admit that it doesn't have the elegance of the Replicator 2, and looks more like the love-child of an Erector Set and a Heathkit (for those of you who remember Heathkits) but it only costs one-third of what the Replicator 2 costs and without modification can print in two types of plastic.

The way they work has been described as a robot-controlled hot-melt glue gun. The gold-colored stage in the picture above moves side-to-side and forward and back, as well as up and down. There is a hot orifice through which molten plastic is extruded in thin layers (in the case of this device as thin as 0.1 mm) as the stage moves around, thus "drawing" the object. This technique is referred to as Fused Filament Fabrication (FFF).

There's one more element that I want to mention, and that is Thingiverse. Thingiverse is a website/database run by MakerBot. Here people upload 3D printable models that they have developed and that can be downloaded for free.

Above you can see a screen shot of the main page. Most of the categories are self-explanatory. The 3D Printing category is mostly parts for various 3D printers. The website gives the user access to literally thousands of printable plans. Some wags have observed that 3D printers give everyone the ability to print their own tchotchkes. Those plastic Yoda statues you want to give your friends are now within reach. There are, however, some exciting and worthwhile things going on that I will talk about in later posts. I will also describe my progress in assembling my printer and learning to use it.

Wednesday, December 18, 2013

Laminar Jet


Twenty-five years ago or so Peg and I took the kids to Epcot Center at Walt Disney World in Florida. While there we saw something that is a little bit difficult to describe but that I thought was way cool. Here is a clip of it from YouTube. As you can see it is still a hit with visitors. Well, I have subsequently found out that that type of fountain is called a laminar jet, and since I first saw it I've been wanting to build one. Well, I've prototyped the first phase, and here it is.


These laminar jets are kind of like the water equivalent of a laser. That is, it gets all the water flowing in the same direction so that when it flies through the air it doesn't spread out like water typically does when it comes out of a garden hose, for instance.

I pieced together how to build one from stuff on the internet, the same place I learn everything else. Below is a picture of what's inside my version. Starting at the bottom is a piece of four inch PVC pipe with a cap glued on one end and a hole drilled through the cap and into the pipe, off-center, from the side. A 3/4 inch pipe is glued into the hole. This is where the water enters the jet. To the right of that is a brass tube with an LED glued into one end and the wires for the LED coming out the other. Then comes a piece of window screen with a plastic ring to hold it in place, a two plastic scouring pads, a whole bunch of drinking straws, another scouring pad and screen with ring, and finally another cap with a hole in it.


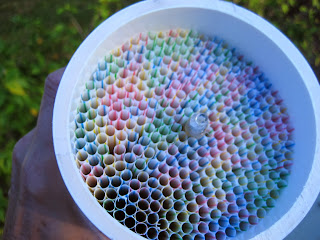
Below is a picture of what it looks like with the LED, screen, two pads and the straws in place. You can see the LED right in the middle. I'll talk more about that LED in another post.


 The way the jet works (in my admittedly simplistic understanding) is the water comes in the small pipe. When it gets into the big pipe it, of course, slows down. The screen is there to hold everything in place. The scrubbing pads break up any eddies, the straws get all the water going in one direction. The scrubbing pad at the top breaks up any eddies where the water exits the straws, the screen holds everything in place, and the water come out the hole all going in the same direction.

There is one other tricky bit, and that has to do with the hole that the water comes out. The edge of the hole should be as thin as possible so that the water contacts the edges as little as possible, thus reducing any swirling or other disturbance. The first hole I made in one of the plastic caps was perfect, and I thought this would be a piece of cake. Not so much. The next two I made had a ragged edge because the plastic tore a tiny bit. Therefore, I decided to make the holes out of brass. I turned a bunch of them on my lathe and they look good. The little hole on the side was just there to keep the brass piece from spinning in the jig as I drilled the hole, and will be covered when I glue the orifices into the plastic caps.


There are still lots of things to do. Turning the water on and off to make the jumping water effect is not as simple as just using an electric valve. Electric valves are just not fast enough, and they create disturbances in the flow. But, I'll talk about that and other things in another post.

Friday, December 13, 2013

Music and me continued

In my last post I said my wine glass playing machine was a little bit of a bust-out. I came across a couple of things on YouTube, as you do, that sent me off in a new direction. The first came from my old standby Matthias Wandel at woodgears.ca where he documents a pipe organ that he made some years ago. I found it interesting but it didn't quite tip me over the edge for two reasons. One, I didn't really want to make a keyboard instrument, and two, he wasn't quantitative enough for me on the making of the pipes.

Then, however, I found Raphi Giangiulio's YouTube videos on how to make wooden organ pipes. My eyes were opened. All the woodworking called for in his videos was well within my capabilities so I made a Middle C pipe according to his specifications, which I demonstrate in this video.


I checked it with an electronic guitar tuner and it was spot-on. Drunken with my new power, but concerned that one pipe does not an organ make, I decided to build some smaller pipes (because they're quicker to make and require less material.) I made F, E, D#, D, C# and C above Middle C, as can be seen in this video.


They have not had their final tuning yet, but they also worked. They have a little bit of a tin-whistle sound, though, so I thought I'd make a bigger pipe and made E below Middle C.

Now I had to figure out what I was going to do with these things. My wine glass machine came to mind and I figured instead of glasses I would have it play organ pipes.

It was at this point when Paolo, a friend of my neighbor came to visit her from Italy. I was tinkering with the pipes when he happened to wander over, and he got a big kick out of them. He expressed interest in helping with the project and we spent the next ten days working on it. The first thing we had to build was what they call, in pipe organ lingo, a wind chest. This is the part that is pressurized by a blower (a shop vacuum in my case) and has a valve for each pipe. Paolo and I used the wind chest design from Matthias Wandel noted above and here's the result.

The wind chest is the part at the top with the red felt to help seal the cover when it is in place. From underneath the wind chest a tube runs from each valve to the corresponding hole in the pipe platform. As you can see I've only run the tubes for the pipes that I've already built.


The wires, when they are lifted, open the valves. When the valve is opened the pipe "speaks". Presumably these forty-two wires would be lifted by solenoids triggered by the computer.

Why forty-two you might ask. As I said, I liked my Middle C pipe, and E pipe, but the lower pipes sounded better than the high pipes, so with no more thought than that I decided to make (eventually, if I don't get sick of it) the Middle C octave, the two octaves below, plus the six pipes I had already made above. Chromatically, that's forty-two pipes. (As I said I didn't think too deeply about it.)

Here's what it sounds like, again without final tuning.

You might notice that in the video there is some background noise. That is my shop vac, in the garage, with the hose running underneath the almost closed door. Okay, that still needs some work. I see why shop vacs never caught on in the great cathedrals of Europe.  I've got some ideas though, and Paolo and I have been trolling the second-hand stores.

To actually connect this to a computer would require maybe $600 worth of solenoids and midi decoders (not to mention the 33 pipes I haven't made yet) so the likelihood that I'll finish this anytime soon is pretty low, but we'll see.


Sunday, December 8, 2013

Music and me

A while back I realized that available on the internet were many thousands of songs stored in a machine readable form called midi (musical instrument digital interface). This is a decades old standard for storing music and controlling musical instruments, stage lighting, and all kinds of effects. For instance, if you hear someone play a synthesizer using a piano-like keyboard, the signals likely are being sent from the keyboard to the synthesizer using midi.

I thought it would be fun to make an instrument that could play the midi files on the internet. Taking the road less traveled, I decided to build a device that played music by tapping on wine glasses.

If you watch this video you'll kind of get the idea. My friend Alan helped me with the design of the hammer mechanism and the whole thing worked more or less as expected with one obvious exception, which I'll come back to in a moment. 
I used what is commonly referred to as a midi decoder from Highly Liquid. This is a device that accepts midi signals and (in this case) translates them into eight switch-closures. I hooked up the switches to the solenoids, the solenoids to the hammers, and as the Brits say, Bob's your uncle.
This is a picture of the midi decoder. The eight black chunks at the top are the relays (switches) and the dip switches at the left let you choose which notes the controller will respond to.

Now, back to the problem. I had bought the cheapest wine glasses I could find, and as you can hear tuning them turned out to be more of a challenge than I could handle. Getting them to ring true was impossible. They played different tones depending on which way they were turned, and of course over time the water evaporated and changed the tuning. Therefore, I decided to rethink the project. 

I flirted with the idea of using steel rods as chimes instead of the glasses. Just as I was about to start on that, however, I came across a couple of videos on YouTube that described how to make a pipe organ. I'll talk about that in my next post.


Monday, November 25, 2013

Weather Station continued


I wanted to add a solar radiation sensor to my weather station but I didn't want it $160 worth like the one from Davis Instruments. I don't need that kind of accuracy, I just want to know how cloudy it is. Then I saw a light sensor on Adafruit that cost four bucks. It had the advantage that it was logarithmic so it could handle big swings in the amount of light it was measuring.
I was thinking about how to protect it from the weather and found a test tube in one of my junk boxes. It was the right diameter so I cut the end off and voilà!, a perfect little glass cover.


I was then considering the mathematical adjustments to make in the readings based on the fact that the angle between the sensor and the sun changes throughout the day and throughout the year. I mentioned these ruminations to my brother Jim, and he suggested that I just etch the glass so it is "frosted" and thus the light will be dispersed more-or-less evenly no matter where the sun is. I thought that was worth a try. I bought some etchant, but due to the fact that glass in the test tube was specially treated, the acid had no effect. Therefore I resorted to the old fashioned way and just took some emery paper and sanded it. 

Next I made a mount for it, embedded it in silicone, and angled it slightly toward the south. Once that was dry I fastened it to the mast holding the anemometer and rain gauge.

I plan to watch the data for the next few weeks to see how it responds to various levels of sunshine at different times of the day and see whether I need to make any adjustments.

Saturday, November 16, 2013

2001: A Space Odyssey, the Weather, and Web Programming

In 1968 I saw the film 2001: A Space Odyssey and one part of it, in particular, stuck in my mind. Around the spaceship were screens that would cycle through tables and graphs of various operating parameters of the ship. Since then I've carried the idea that it would be interesting if I could have these types of displays in my house, showing information on what was going on as far as the various systems in the house and the environment around it.


A few years ago I bought a Davis Instruments Vantage Pro2 Weather Station. My brother Jim has always been interested in weather, and my sister Monica took a course in weather forecasting when she was in college and gave me a copy of some of the handouts from that course at the time. I guess I caught the interest from them. Well, I had the weather station set up at my house in Chicago but I took it down when I moved to Asia. Now that I'm retired and living in Florida I set it up again. It gave me the idea that this could be one of the sources for data for the "2001" displays.

My idea was to create a screensaver that I would put on each of the computers around the house so that when they weren't being used they would start cycling through the various graphs and tables. I thought the best way to do that was with web pages, but I didn't know anything about web programming. Fortunately my nephew Matt did. I got a single board Linux computer and dove in. I then realized how steep a learning curve there was. The little UNIX knowledge I had was from twenty years ago, but worse than that, it wasn't just UNIX I needed. I had to learn at least a little something about HTML, JavaScript, CSS, PHP, and SQL. Every time I got stuck though, Matt was able to bail me out.

Well the webpages are finally working, and I have been saving weather data every five minutes since May, 2013 (with some hiccups) and so I have included some screen shots.


Now I just need to turn them into a screensaver and phase I will be complete.

Further Work

Besides adding another sensor or two to the weather station I want to measure things like my electricity, gas, and water usage, including monitoring the performance of the pool equipment and HVAC, and maybe even things like lp gas and carbon monoxide sensors. But at least now I have a platform on which to build.

Wednesday, November 6, 2013

Orange Sorter for Historic Spanish Point

My wife volunteers at Historic Spanish Point in Osprey Florida. It is a reserve that was part of the estate of Bertha Palmer, a significant figure in the development of the west coast of Florida, and someone with strong links to Chicago as well.

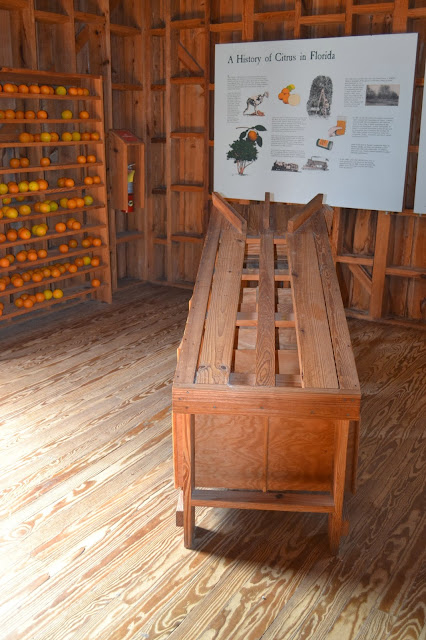
They have a reconstruction of a device that was used to sort by size the oranges that were grown there. Below are a couple of pictures. As you can likely see, the oranges are dumped in at the upper end. As they roll down the inclined top they fall into the gap between the boards that form the top. However, since the boards are closer together near the top of the "hill", and farther apart toward the bottom, the oranges fall through into the various crates based on size.


Jane Glennan is the Outreach Coordinator at Historic Spanish Point. She asked me if I would make a model of the orange sorter that she could use when she goes out and makes presentations on Historic Spanish Point to schools and other groups. Here is my miniature version. It is about 15 inches long, and is designed to sort three different sizes of wooden balls.


Below is the completed model. Jane supplied the little crates and decorated the wooden balls as faux oranges.


Sunday, October 27, 2013

EL Wire Animation

EL Wire Animation

Here is a video of an animation I did using electro-luminescent (EL) wire. For those of you who aren't familiar with EL technology, it uses a coating that phosphoresces, when excited by a high voltage, low amperage alternating current. It can be used like "neon" tubing, but is flexible, and does not get hot. It comes in an assortment of colors, and is relatively easy to work with.


The video shows the animation just after it is turned on. It starts out "asleep" with the eyes closed. After a few seconds it "wakes up". The eyes open, tentatively at first, and blink occasionally, at random intervals. The device has a proximity sensor that can tell if someone is close to it. After a few minutes, if no one is standing close, it "goes to sleep", with the eyelids becoming progressively heavier, and finally closing. If someone approaches it again "wakes up". If, after it has gone to sleep, no one approaches for several minutes, it turns the electronics off completely. Thank you Ayako for being the model for these eyes.

Technology

EL material is actually readily available in three form factors, wire, ribbon, and sheet. You may have seen the sheet material built into night lights. These have a panel, a couple of inches square, that glows, usually blue or green, when plugged into an outlet. As I said above, in order to make it glow, the material must be energized with alternating current, usually in the range of 100-150V and a frequency of a couple of thousand hertz. Producing this is a little more complicated than just slapping a 9V battery into a circuit like one might do in a conventional microcontroller project. Luckily, inverters that handle the conversion from battery or mains power are are readily and inexpensively available.

An animation like this requires an additional piece, however. This is commonly referred to as an EL Sequencer.  (see photo below)


 I used one I bought from Sparkfun.This one has an arduino compatible microcontroller that can control eight independent pieces of EL wire, seven of which I used for this device. The circuit for switching the EL wire could certainly be home-built, but since it involves switching high voltage AC current, the design is somewhat more complicated than the typical circuits that I build. I bought the wire from Light 'N Wire Productions.

Potential Improvements

I had originally planned to use a sound sensor (piezo microphone) rather than a proximity sensor so the animation would wake up when it heard something rather than when it "saw" something. I couldn't get it to work dependably though. The problem was that the frequency of the inverter is 1000-2000hz, and this is in the human audible range, the same range I wanted to sense with the microphone. At the time I built this project I knew next to nothing about filters and couldn't make one that would filter out the hum from the inverter but still leave the microphone sensitive enough to work. I still don't know much about filters but I might take another swipe at converting it to audio sensibility. It just seems that it fits with the metaphor better.


Saturday, October 5, 2013

Sous Vide Cooker

Sous Vide Cooker

I built a sous vide cooker. For those of you unfamiliar with the process, sous vide means under vacuum and refers to the fact that before being cooked the food is vacuum packed. This is typically done with a device like a Seal-a-Meal or Foodsaver. The food is then cooked in a water bath to a precise temperature. This method of cooking has some advantages. It can prepare food to the same degree of "doneness" throughout. So, for instance, if you like your beef medium-rare you can cook a roast so that the whole piece is medium-rare, from the outside to the middle, from the thick end to the thin end. Also, you're able to control the temperature precisely so it will be medium-rare, or whatever you like, every time. Further, the food can be prepared in advance, then held for hours with no chance of over cooking.

As you can imagine, however, one must be careful with this type of cooking so that the bacteria in the food are killed. For that reason precise temperature control is essential. To achieve this a PID (proportional-integral-derivative) controller is used. This is essentially a very clever thermostat. Rather than taking into consideration only the current temperature versus the set temperature as a conventional thermostat does, a PID controller manages how quickly the device responds to an under or over temperature condition, the undershoot or overshoot of the temperature, and the temperature oscillation.

There was an article in Make Magazine Volume 25 by Scott Heimendinger that laid out in detail the design and construction of a homemade sous vide cooker. I showed it to my brother John who is something of a boffin in the area of food preparation. He had bought a sous vide sometime back and was familiar with their operation. We looked over the article and he commented that it seemed like it would make sense to build one from a cooler to better stabilize the temperature and to reduce energy consumption. So that's what I did.


Below is a picture of my creation showing a project box fastened to the top of the cooler. It contains the PID Controller, the control panel of which can be seen, a solid state relay and heat sink for switching on and off the heating elements, and various electrical connections.


With the top open it is clear how much I borrowed from Scott Heimendinger's design.

The viewer can see the three heating elements, and the black box is a submersible pump to circulate the water during cooking. Between the heaters and the pump the thermocouple that measures the temperature of the water is visible.


Potential Improvements

While I'm very happy with my cooker's performance there are a couple of things I would change in version 2.0. I have read that these heating elements are extremely sensitive to being powered when not immersed in water, and can burn out almost instantly. Thus I would put an interlock switch such that power would be disconnected if the top is opened. I might also replace the coffee cup type heaters with a heating element from a small hot water heater. I would mount this through a hole below the water line. This, of course, presents the problem of making the penetration leak-proof. This would be complicated by the fact that plastic coolers have double walls, both of which are flexible.

I might also use a slightly larger cooler. The size hasn't been an issue but cooking for a very large party might be problematic.

Friday, October 4, 2013

Wire Sculpture

My running shoes and I spend so much time together I thought I'd do a little homage to them and New Balance.


Arduino Swim Lap Counter

I like to swim laps in my pool.... That might be a bit of a misstatement. I like to get the exercise that comes with swimming laps in my pool. The truth be told, however, swimming back and forth a hundred times is pretty boring. What made it worse was that I was keeping count of the laps in my head and if my mind would wander I would lose count.

In order that I could use the time more productively by thinking about my next project, or trying to figure out why my last project didn't work, I decided to build an electronic lap counter.


It keeps track of the number of laps, the time on the current lap, time on the previous lap, and total elapsed time.


A Little More Detail

The project is based on the Arduino microcontroller. I built the digits using LED Light Bars that I got from Sparkfun Electronics. I'm near-sighted so I wanted them big enough so that I could read them without my glasses. As noted above the timer keeps track of laps, current lap time, previous lap time, and total time, but I can control which of those values is displayed via the toggle switches that can be seen on the left side of the device in the picture above. It cycles through whichever values are selected for display by the toggle switches, showing each for about two seconds.

The trigger switch is build from a piece of aluminum bar, bent at a 90 degree angle, and then covered with closed-cell foam. I wanted to be able to activate it by either pushing horizontally on the part that sticks down into the pool or vertically by pushing down from the top. The switch triggers an interrupt on the Arduino so it is very dependable.

I experimented with RFID tags as triggers. I thought it would be good if my wife and I could both use it and it would know who was swimming and thus, maybe, keep track of workouts over time for both of us -- that sort of thing. The inexpensive RFID tags only have a range of a few inches, however, and so the touch-point needed to be so precise it just didn't seem practical. Thus, for now, it doesn't keep track of any information from workout to workout.

At the end of the day, however, I consider the project a complete success. While I would never confuse swimming laps with having fun, when I'm doing it I am using my mind for something more productive than counting.

Thursday, October 3, 2013

Air Engine

I've always been fascinated by external combustion engines. I guess it's an outgrowth of my love for trains and the fact that as a very young child I saw some of the last of the steam locomotives in scheduled service in the US.

I was inspired to build an air engine, that is, one that is driven by an air pressure difference, by Matthias Wandel. For those of you not familiar with his work I heartily encourage you to look into his YouTube channel or his website woodgears.ca. His projects are great and the quality of his videos is very high. Matthias sells plans for an air engine, although I did not use them but made up my own design.

Here is a quick video of it in operation.

Some Details

The engine will run from either a source of vacuum or pressure. The video shows it running on my shop vacuum. Except for the screws in the bearing caps of the crankshaft it is made completely of wood. It is a "dual-action" design. That is, the piston is alternately driven from above, then below, as opposed to an internal combustion engine, for instance, where the piston is only driven from above.

The cylinder has two ports, one near each end. Then there is a valve mechanism that switches the vacuum or pressure between the two ports, coordinated with the movement of the piston.

One more thing. I would encourage the interested reader to look on the Jay Leno's Garage YouTube channel for the "1832 Steam Engine" video. This is a stationary steam engine that was used to power a factory that Jay has restored to working order. If you've never seen one of these large steam engines running you will be surprised at how quiet and, dare I say, beautiful they are in operation.

Arduino Drawing Bot


 Drawing Bot


I built a drawing robot. Here is a rough little video of it in action.


The design, shown below, is certainly not original with me but I had all the parts laying around and I thought it would produce a nice profile picture.

The stepper motors wind and unwind the thread in order to position the Sharpie. Not shown in the above drawing is a solenoid mechanism that raises and lowers the Sharpie so that as it moves along it can either draw or not.

More Detail

I wrote a quick program in Processing on my pc that captures a photo and then rescales it and converts it to binary, that is, no color or gray-scale, just black or white pixels. The program then creates a file that is essentially just a list of every pixel in the picture with a "1" if the pixel is black or "0" if the pixel is white. My plan was to transmit the 1s and 0s to an Arduino over the serial connection but the current version of Processing doesn't support Serial on 64-bit Windows. So, I just copied the file to an SD card, and sneaker-netted it to an Arduino Uno with an SD shield on top.

The program on the Uno just moves back and forth across the drawing area, raster style, reading the file and putting the Sharpie down if the next point is a "1" or up if the next point is a "0". The program uses the Pythagorean theorem to to calculate how long the threads should be at each point, and based on how long they were for the last point it either winds or unwinds thread from the shafts of the two stepper motors.

What I would do next

The Drawing Bot is slow. Depending on the resolution of the picture it can take hours to complete a drawing. The Arduino program could certainly be made more efficient. For instance, right now it just draws from left to right, then returns to the left end of the next line down. If it drew in both directions it would probably be 30% faster. It could also be made to skip more directly over areas where nothing is to be drawn.

Further, I built it to draw using 8 1/2" x 11" paper. If desired, though, without any changes in the design (just longer thread) it could easily draw pictures ten times as large. Of course without improving the efficiency of the program you'd be a lot older by the time it got done.

WAK