Monday, December 30, 2013

3D Printer

Best of the season to everyone. For Christmas, Peg gave me a 3D printer. For those of you who have spent the last couple of years in a sensory deprivation chamber, 3D printers are devices that can print solid objects a little like a dot matrix printer (for those of you who remember them) can print text on paper. These devices have been around for twenty-five or thirty years, but in the last couple they have gotten much cheaper. This is due to several things. These include the "maker movement" where is has become popular to create and build things oneself, the "open hardware movement", where people place the designs they develop in the public domain, and the expiration of some key patents.

These devices can print in a range of materials from various plastics to metals to sugar and chocolate. They range in price and capability from tens or even hundreds of thousands of dollars for large, highly developed machines that can print metal parts that are ready to be used, to a few hundred dollars for hobbyist machines that will print in one kind of plastic and that require more hand-holding to produce satisfactory results.  Below is a picture of a MakerBot Replicator 2. This might be described as a pro-sumer machine. It is a well developed device that is designed to print in one kind of plastic. Right now it costs around $2,200.


 That was too much for me to spend so I went a different way. There is an organization called the RepRap Project that developed plans for a series of 3D printers and published those plans for free. Thus, if you have a 3D Printer you can use it to produce another 3D printer. In this case that only goes for the plastic pieces, not the metal bits or the electronics, but you get the idea.

Below is a chart showing the usage by printer type.

Source: Moilanen, J. & Vadén, T.: Manufacturing in motion: first survey on the 3D printing community, Statistical Studies of Peer Production.
RepRap is really just plans, not a device, but there is an outfit called RepRapPro that sells kits for the RepRap printers and that's where Peg got mine. It is called a RepRapPro Mono Mendel and below is a picture of the assembled device.


I admit that it doesn't have the elegance of the Replicator 2, and looks more like the love-child of an Erector Set and a Heathkit (for those of you who remember Heathkits) but it only costs one-third of what the Replicator 2 costs and without modification can print in two types of plastic.

The way they work has been described as a robot-controlled hot-melt glue gun. The gold-colored stage in the picture above moves side-to-side and forward and back, as well as up and down. There is a hot orifice through which molten plastic is extruded in thin layers (in the case of this device as thin as 0.1 mm) as the stage moves around, thus "drawing" the object. This technique is referred to as Fused Filament Fabrication (FFF).

There's one more element that I want to mention, and that is Thingiverse. Thingiverse is a website/database run by MakerBot. Here people upload 3D printable models that they have developed and that can be downloaded for free.

Above you can see a screen shot of the main page. Most of the categories are self-explanatory. The 3D Printing category is mostly parts for various 3D printers. The website gives the user access to literally thousands of printable plans. Some wags have observed that 3D printers give everyone the ability to print their own tchotchkes. Those plastic Yoda statues you want to give your friends are now within reach. There are, however, some exciting and worthwhile things going on that I will talk about in later posts. I will also describe my progress in assembling my printer and learning to use it.

Wednesday, December 18, 2013

Laminar Jet


Twenty-five years ago or so Peg and I took the kids to Epcot Center at Walt Disney World in Florida. While there we saw something that is a little bit difficult to describe but that I thought was way cool. Here is a clip of it from YouTube. As you can see it is still a hit with visitors. Well, I have subsequently found out that that type of fountain is called a laminar jet, and since I first saw it I've been wanting to build one. Well, I've prototyped the first phase, and here it is.


These laminar jets are kind of like the water equivalent of a laser. That is, it gets all the water flowing in the same direction so that when it flies through the air it doesn't spread out like water typically does when it comes out of a garden hose, for instance.

I pieced together how to build one from stuff on the internet, the same place I learn everything else. Below is a picture of what's inside my version. Starting at the bottom is a piece of four inch PVC pipe with a cap glued on one end and a hole drilled through the cap and into the pipe, off-center, from the side. A 3/4 inch pipe is glued into the hole. This is where the water enters the jet. To the right of that is a brass tube with an LED glued into one end and the wires for the LED coming out the other. Then comes a piece of window screen with a plastic ring to hold it in place, a two plastic scouring pads, a whole bunch of drinking straws, another scouring pad and screen with ring, and finally another cap with a hole in it.


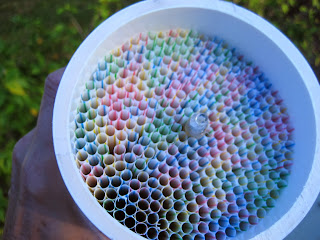
Below is a picture of what it looks like with the LED, screen, two pads and the straws in place. You can see the LED right in the middle. I'll talk more about that LED in another post.


 The way the jet works (in my admittedly simplistic understanding) is the water comes in the small pipe. When it gets into the big pipe it, of course, slows down. The screen is there to hold everything in place. The scrubbing pads break up any eddies, the straws get all the water going in one direction. The scrubbing pad at the top breaks up any eddies where the water exits the straws, the screen holds everything in place, and the water come out the hole all going in the same direction.

There is one other tricky bit, and that has to do with the hole that the water comes out. The edge of the hole should be as thin as possible so that the water contacts the edges as little as possible, thus reducing any swirling or other disturbance. The first hole I made in one of the plastic caps was perfect, and I thought this would be a piece of cake. Not so much. The next two I made had a ragged edge because the plastic tore a tiny bit. Therefore, I decided to make the holes out of brass. I turned a bunch of them on my lathe and they look good. The little hole on the side was just there to keep the brass piece from spinning in the jig as I drilled the hole, and will be covered when I glue the orifices into the plastic caps.


There are still lots of things to do. Turning the water on and off to make the jumping water effect is not as simple as just using an electric valve. Electric valves are just not fast enough, and they create disturbances in the flow. But, I'll talk about that and other things in another post.

Friday, December 13, 2013

Music and me continued

In my last post I said my wine glass playing machine was a little bit of a bust-out. I came across a couple of things on YouTube, as you do, that sent me off in a new direction. The first came from my old standby Matthias Wandel at woodgears.ca where he documents a pipe organ that he made some years ago. I found it interesting but it didn't quite tip me over the edge for two reasons. One, I didn't really want to make a keyboard instrument, and two, he wasn't quantitative enough for me on the making of the pipes.

Then, however, I found Raphi Giangiulio's YouTube videos on how to make wooden organ pipes. My eyes were opened. All the woodworking called for in his videos was well within my capabilities so I made a Middle C pipe according to his specifications, which I demonstrate in this video.


I checked it with an electronic guitar tuner and it was spot-on. Drunken with my new power, but concerned that one pipe does not an organ make, I decided to build some smaller pipes (because they're quicker to make and require less material.) I made F, E, D#, D, C# and C above Middle C, as can be seen in this video.


They have not had their final tuning yet, but they also worked. They have a little bit of a tin-whistle sound, though, so I thought I'd make a bigger pipe and made E below Middle C.

Now I had to figure out what I was going to do with these things. My wine glass machine came to mind and I figured instead of glasses I would have it play organ pipes.

It was at this point when Paolo, a friend of my neighbor came to visit her from Italy. I was tinkering with the pipes when he happened to wander over, and he got a big kick out of them. He expressed interest in helping with the project and we spent the next ten days working on it. The first thing we had to build was what they call, in pipe organ lingo, a wind chest. This is the part that is pressurized by a blower (a shop vacuum in my case) and has a valve for each pipe. Paolo and I used the wind chest design from Matthias Wandel noted above and here's the result.

The wind chest is the part at the top with the red felt to help seal the cover when it is in place. From underneath the wind chest a tube runs from each valve to the corresponding hole in the pipe platform. As you can see I've only run the tubes for the pipes that I've already built.


The wires, when they are lifted, open the valves. When the valve is opened the pipe "speaks". Presumably these forty-two wires would be lifted by solenoids triggered by the computer.

Why forty-two you might ask. As I said, I liked my Middle C pipe, and E pipe, but the lower pipes sounded better than the high pipes, so with no more thought than that I decided to make (eventually, if I don't get sick of it) the Middle C octave, the two octaves below, plus the six pipes I had already made above. Chromatically, that's forty-two pipes. (As I said I didn't think too deeply about it.)

Here's what it sounds like, again without final tuning.

You might notice that in the video there is some background noise. That is my shop vac, in the garage, with the hose running underneath the almost closed door. Okay, that still needs some work. I see why shop vacs never caught on in the great cathedrals of Europe.  I've got some ideas though, and Paolo and I have been trolling the second-hand stores.

To actually connect this to a computer would require maybe $600 worth of solenoids and midi decoders (not to mention the 33 pipes I haven't made yet) so the likelihood that I'll finish this anytime soon is pretty low, but we'll see.


Sunday, December 8, 2013

Music and me

A while back I realized that available on the internet were many thousands of songs stored in a machine readable form called midi (musical instrument digital interface). This is a decades old standard for storing music and controlling musical instruments, stage lighting, and all kinds of effects. For instance, if you hear someone play a synthesizer using a piano-like keyboard, the signals likely are being sent from the keyboard to the synthesizer using midi.

I thought it would be fun to make an instrument that could play the midi files on the internet. Taking the road less traveled, I decided to build a device that played music by tapping on wine glasses.

If you watch this video you'll kind of get the idea. My friend Alan helped me with the design of the hammer mechanism and the whole thing worked more or less as expected with one obvious exception, which I'll come back to in a moment. 
I used what is commonly referred to as a midi decoder from Highly Liquid. This is a device that accepts midi signals and (in this case) translates them into eight switch-closures. I hooked up the switches to the solenoids, the solenoids to the hammers, and as the Brits say, Bob's your uncle.
This is a picture of the midi decoder. The eight black chunks at the top are the relays (switches) and the dip switches at the left let you choose which notes the controller will respond to.

Now, back to the problem. I had bought the cheapest wine glasses I could find, and as you can hear tuning them turned out to be more of a challenge than I could handle. Getting them to ring true was impossible. They played different tones depending on which way they were turned, and of course over time the water evaporated and changed the tuning. Therefore, I decided to rethink the project. 

I flirted with the idea of using steel rods as chimes instead of the glasses. Just as I was about to start on that, however, I came across a couple of videos on YouTube that described how to make a pipe organ. I'll talk about that in my next post.